Enrollment management is how you track who's registered for classes, mark attendance, and update participation status. This is essential for maintaining accurate training records and certifications.
Enrollment Edit - Full enrollment control and status management
Class Admin - Complete class management including enrollment
Enrollment in TMaRS tracks who's registered for each class session. People can enroll in multiple ways:
Self-enrollment - Users register themselves through the user-facing catalog
Administrator enrollment - You add people manually using the Add People feature
Proxy enrollment - Someone else (like a supervisor or assistant) enrolls them
Enrollment Lifecycle
A typical enrollment goes through these stages:
Registration - Person enrolls or is enrolled (status: Enrolled)
If class is full - Person is automatically placed on waitlist (status: Waitlisted)
Before class - Status remains Enrolled, or person may cancel
After class - Administrator marks attendance (Completed, No Show, Could Not Complete)
Certification - Completed status triggers any course certifications
Tip: When viewing enrollment lists, you'll see a NetID in parentheses under some enrolled people. This shows who enrolled them (e.g., "(jls515)" means jls515 enrolled that person). This helps track proxy enrollments.
Viewing Enrollment
To view who's enrolled in a class:
Navigate to Classes in the sidebar
Find the class in the table and click it
Click the Edit Enrollment button at the top
Understanding the Enrollment Page
Enrollment Overview
Enrollment Overview
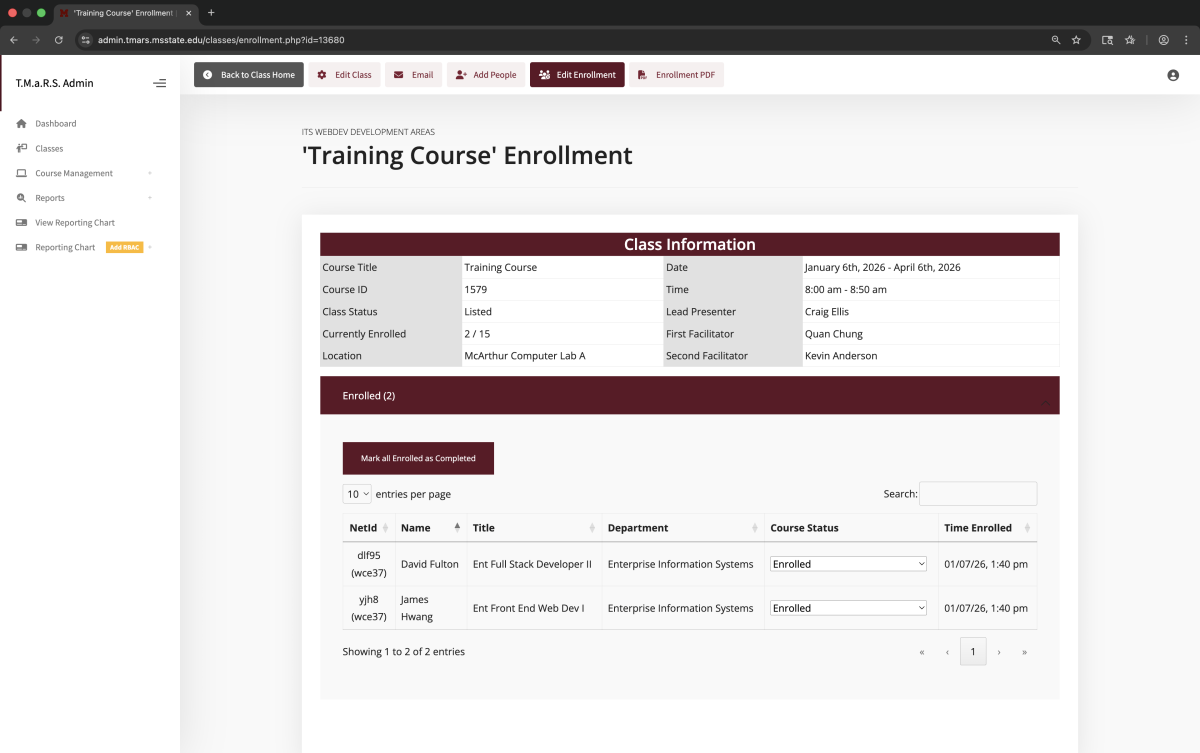
The enrollment page shows class information at the top and enrollment lists organized by status below. Each status has its own accordion section showing how many people are in that status.
Only one accordion section can be open at a time. Click on a status header to expand that group and see the people in it.
Class Information Panel
At the top of the enrollment page, you'll see key class details:
Course Title - Which course this class is for
Course ID - Unique course identifier
Class Status - Listed, Cancelled, etc.
Currently Enrolled - Shows enrolled count / total capacity (e.g., "2 / 200")
Location - Where the class is held
Date & Time - When the class takes place
Lead Presenter & Facilitators - Who's teaching
Enrollment Accordions
Below the class information, enrollment is organized into collapsible accordion sections by status. Each accordion shows the count in parentheses (e.g., "Enrolled (2)").
Click any accordion header to expand that section and see the people with that status. When you expand a section, any other open section automatically closes.
Working with Enrollment Tables
Each expanded accordion contains a table with enrolled people. The tables use DataTables functionality:
Entries per page - Dropdown to show 10, 25, 50, or 100 entries
Search box - Filter by name, NetID, or department
Sortable columns - Click column headers to sort
Pagination - Navigate through pages if you have many enrollments
Each person's row shows:
NetId - Their university NetID (with enrolling person's NetID in parentheses if proxy-enrolled)
Name - Full name
Title - Job title
Department - Organizational unit
Course Status - Dropdown to change their enrollment status
Time Enrolled - When they registered
Adding People to Classes
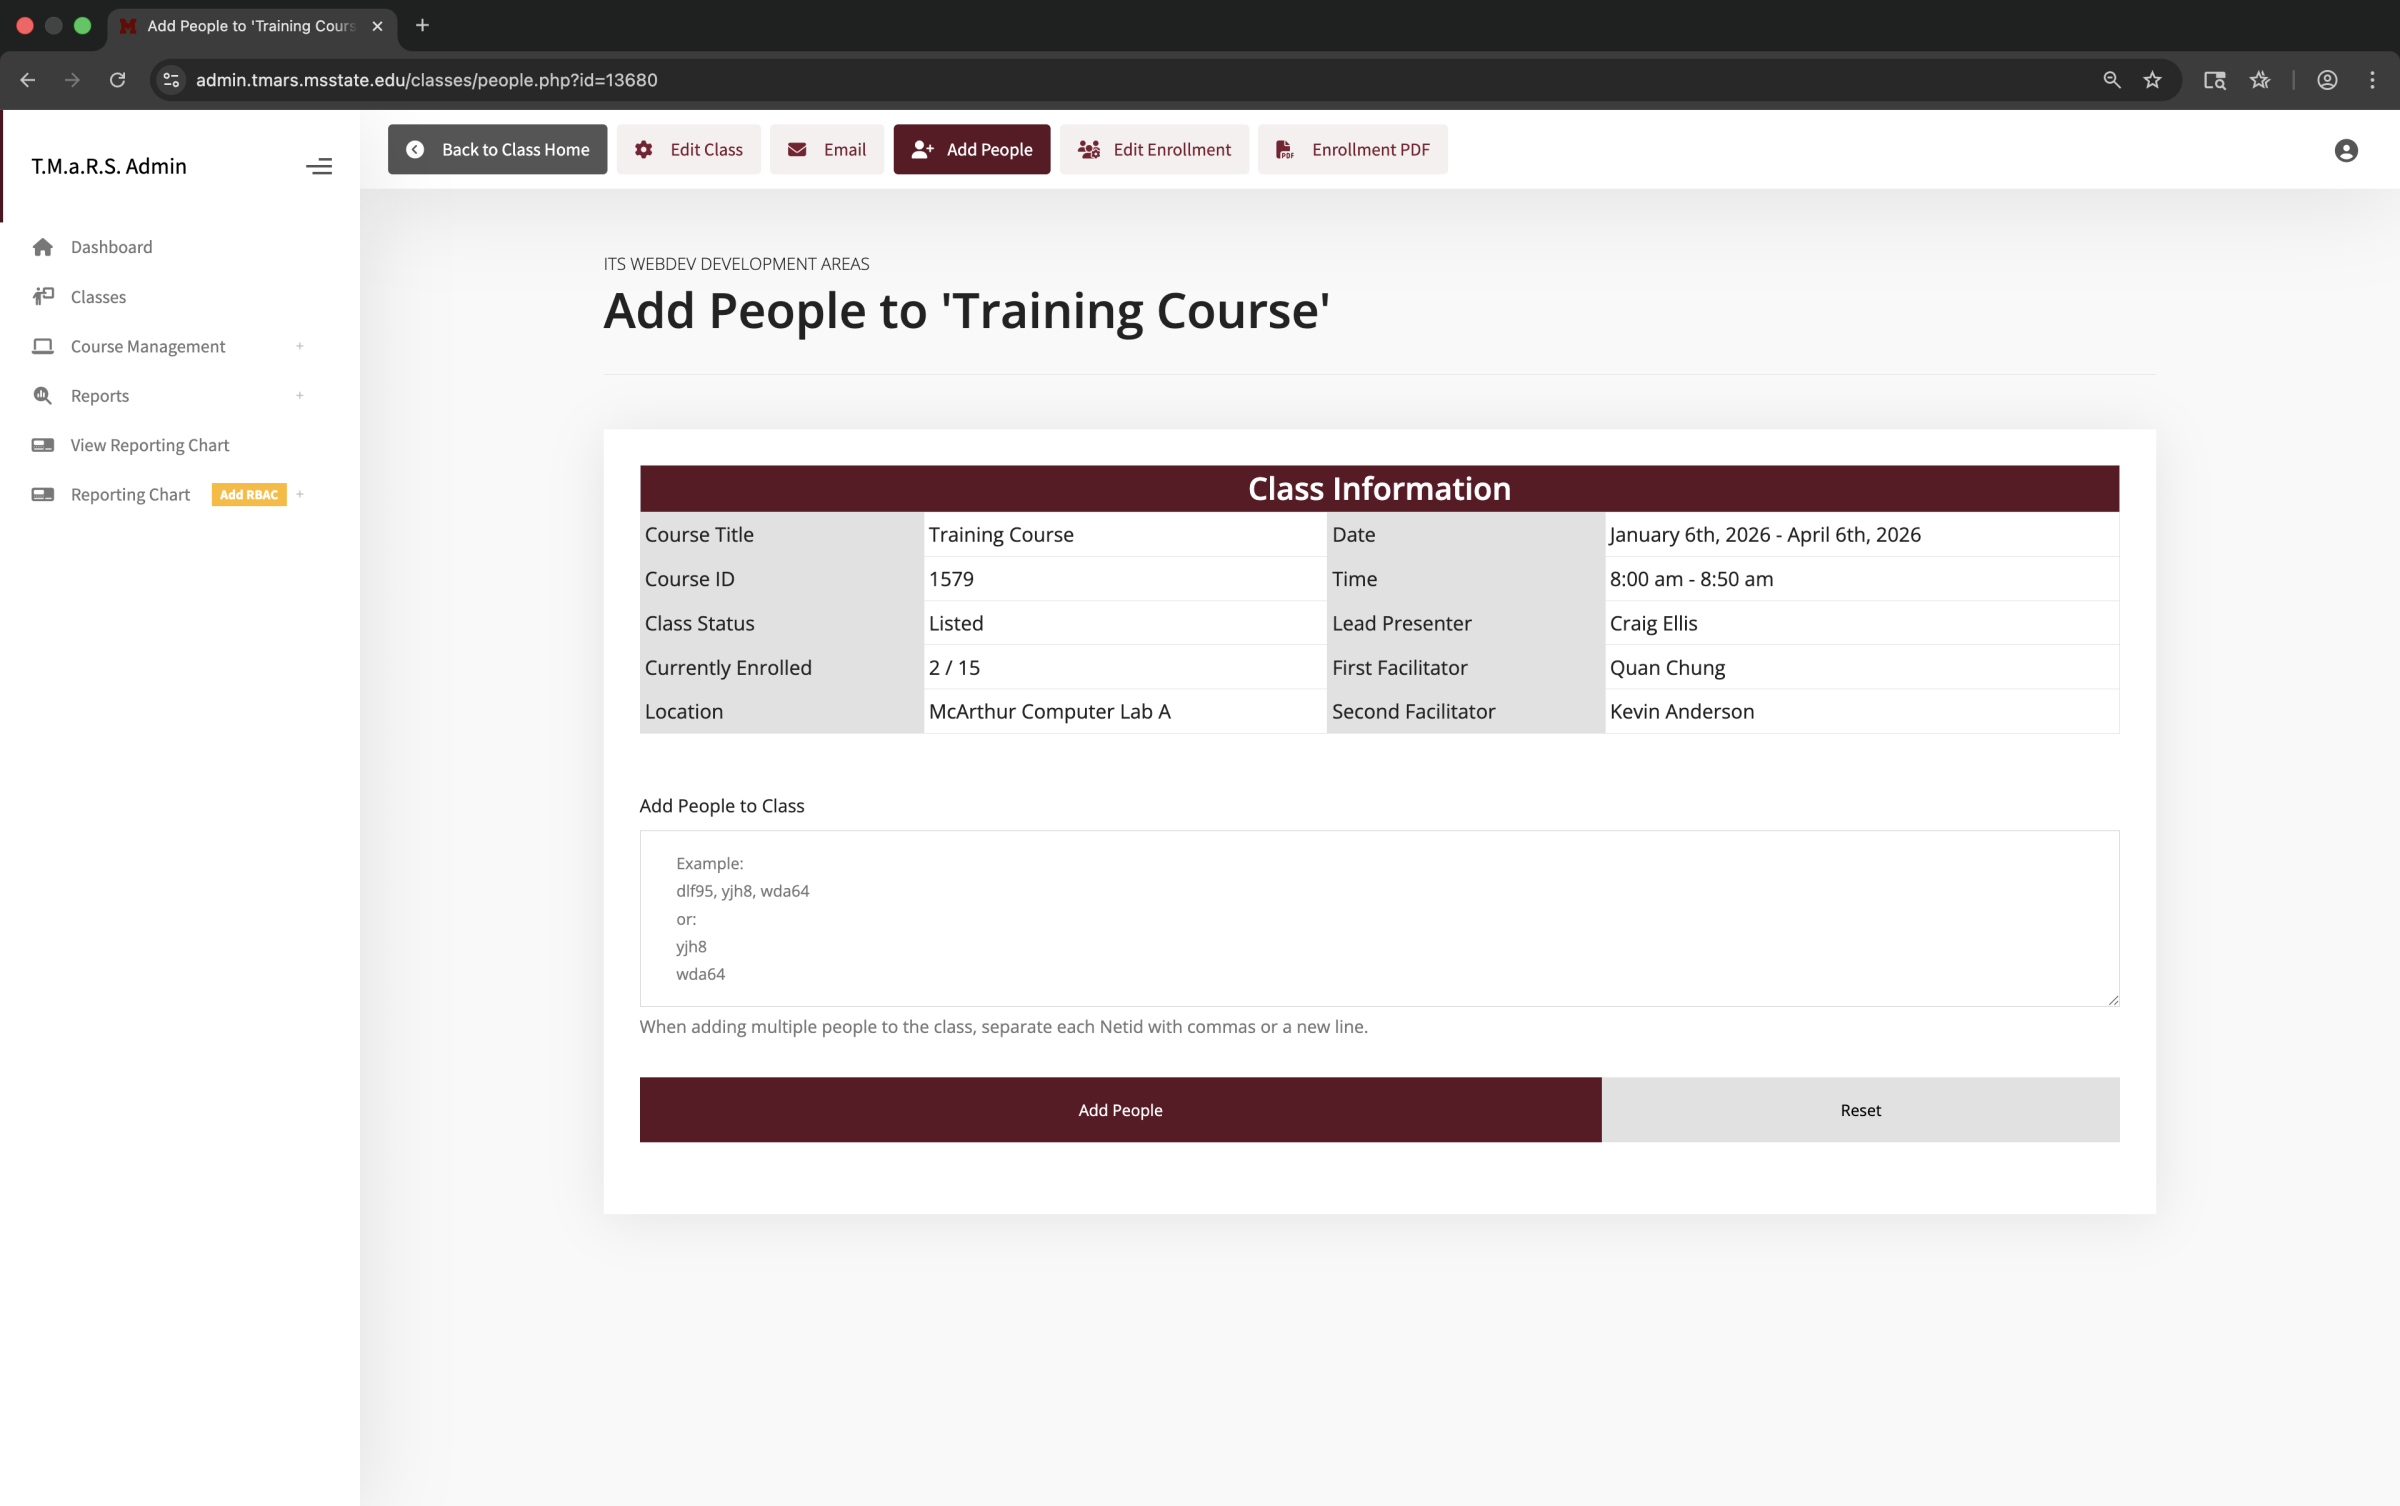
Adding People to Classes
While users can self-enroll through the catalog, administrators can also manually add people to classes. This is useful for:
Enrolling people who requested training via email or phone
Required training where you need to enroll specific individuals
Bulk enrollment of a department or team
Adding people who have enrollment issues
How to Add People
Bulk Enrollment by NetID
To add people to a class:
View the class (eye icon from Classes page)
Click the Add People button at the top
Enter NetIDs in the text area
Click Add People to enroll them
You can add multiple people at once by separating NetIDs with commas or putting each on a new line.
NetID Format Examples
You can format the NetID list in two ways:
Comma-separated:
dlf95, yjh8, wda64
One per line:
yjh8
wda64
dlf95
The system validates each NetID and adds valid users to the class. If a NetID doesn't exist, you'll get an error for that specific person.
Capacity and Waitlist
When you add people to a class:
If spots are available, they're enrolled with status "Enrolled"
If the class is at capacity, they're automatically added to the waitlist
The class capacity is based on the room's default size or the Seat Override value
You cannot prevent someone from being added to a class (they'll just go to the waitlist if it's full).
Tip: When you add people as an administrator, your NetID appears in parentheses under their NetID on the enrollment list. This tracks who enrolled them, which is helpful for managing required training programs.
Managing Enrollment Status
Managing Enrollment Status
Each enrolled person has a status that tracks their relationship to the class. You can change these statuses individually using the dropdown in their row on the Edit Enrollment page.
All Enrollment Statuses
Status
Meaning
When to Use
Not Enrolled
Person is not registered for the class
Removes them from the class entirely
Waitlisted
On the waiting list
Automatically set when class is full; manually move people here if needed
Enrolled
Confirmed registration
Default status for registered participants
Participant Canceled the Class
Person withdrew themselves
When someone cancels their own registration
No Show
Did not attend
Mark after class for people who didn't show up
Course was Canceled by Admin
Admin cancelled the entire class
System sets this when you cancel the class
Completed
Successfully attended and completed
Mark after class for successful participants
Could Not Complete
Attended but didn't meet requirements
When someone attends but doesn't pass or finish
Removed - Lacks Prerequisites
Doesn't meet prerequisites
When you discover someone enrolled without required prior training
Admin Test Person - Ignore
Test enrollment
For testing purposes, excluded from reports
Removed
Removed by administrator
When you remove someone for other reasons
Changing Status Individually
To change a person's enrollment status:
Go to Edit Enrollment for the class
Expand the accordion containing the person
Find the person in the table
Click the Course Status dropdown in their row
Select the new status
After you change the status:
The system saves the change automatically
"UPDATED" appears below the dropdown briefly to confirm
The person should move to the appropriate accordion section (or refresh the page if they don't appear to move)
About Status Changes
When you change someone's status, they should automatically appear in the correct accordion section. If you don't see them move immediately, try refreshing the page. The system is working to improve this automatic update behavior.
After the Class
After a training session is complete, you need to mark attendance. This is critical for:
Tracking who completed training
Issuing certifications
Compliance reporting
Training records
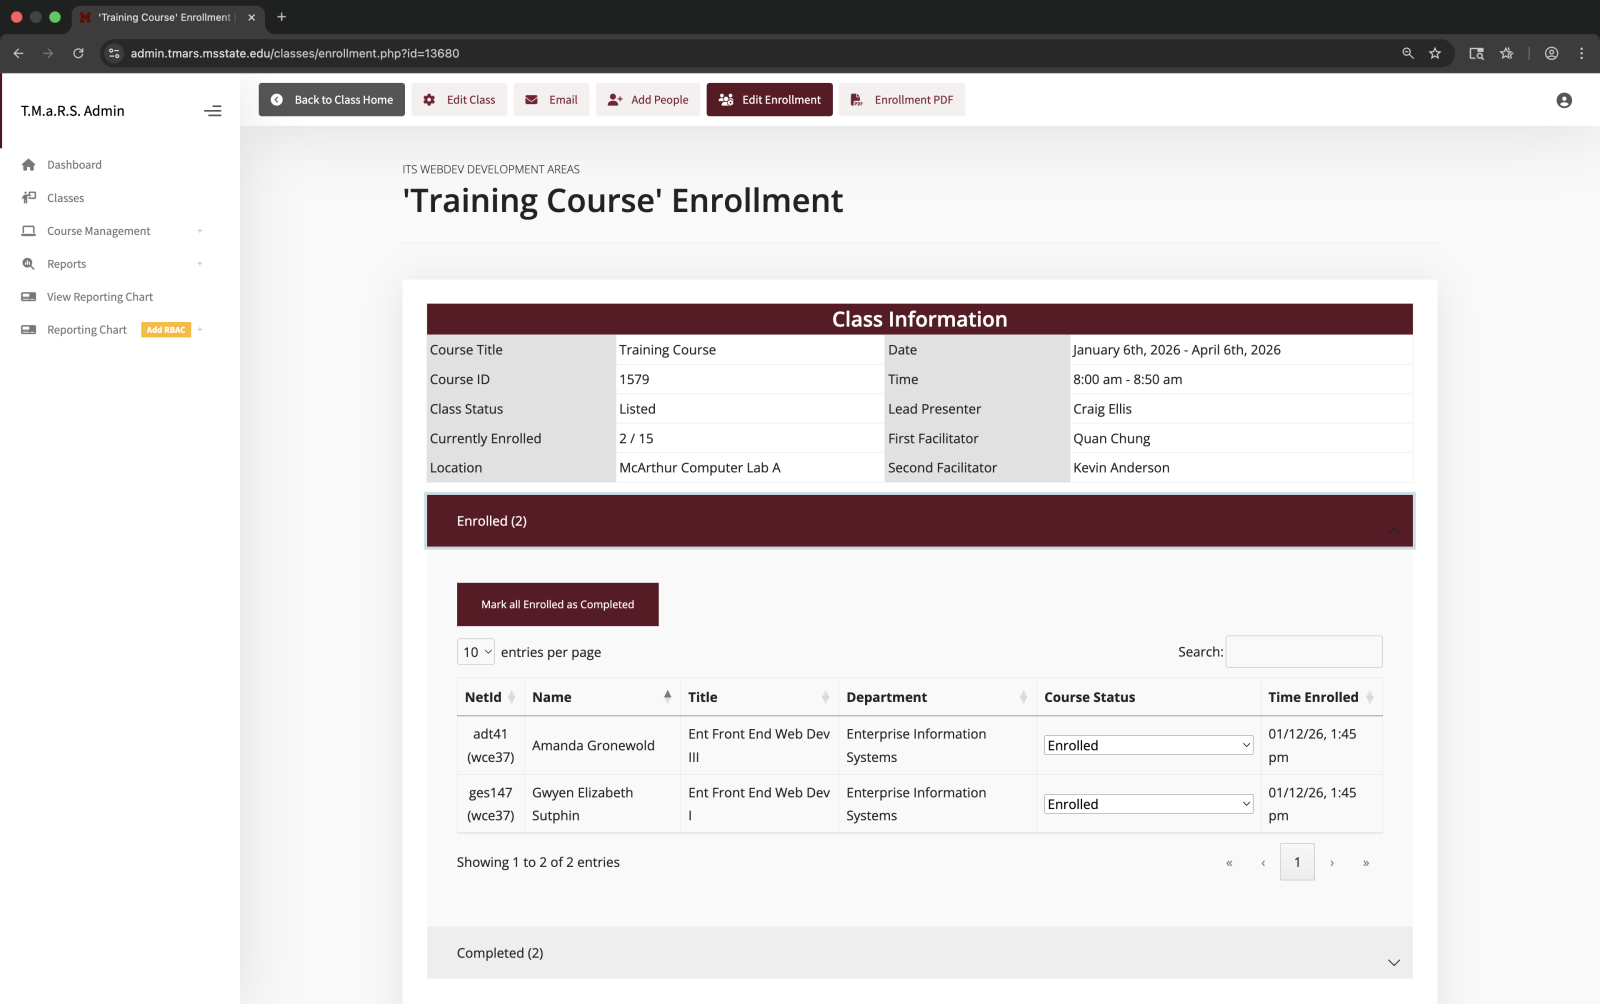
Mark All Enrolled as Completed
The fastest way to mark attendance is to use the bulk completion feature:
Go to Edit Enrollment for the class
Expand the Enrolled accordion
Click the Mark all Enrolled as Completed button
This immediately changes all people with status "Enrolled" to "Completed"
Tip: Most administrators use "Mark all Enrolled as Completed" first, then individually change the status for anyone who didn't attend or didn't complete. This is much faster than changing each person's status one-by-one.
Marking No Shows and Other Statuses
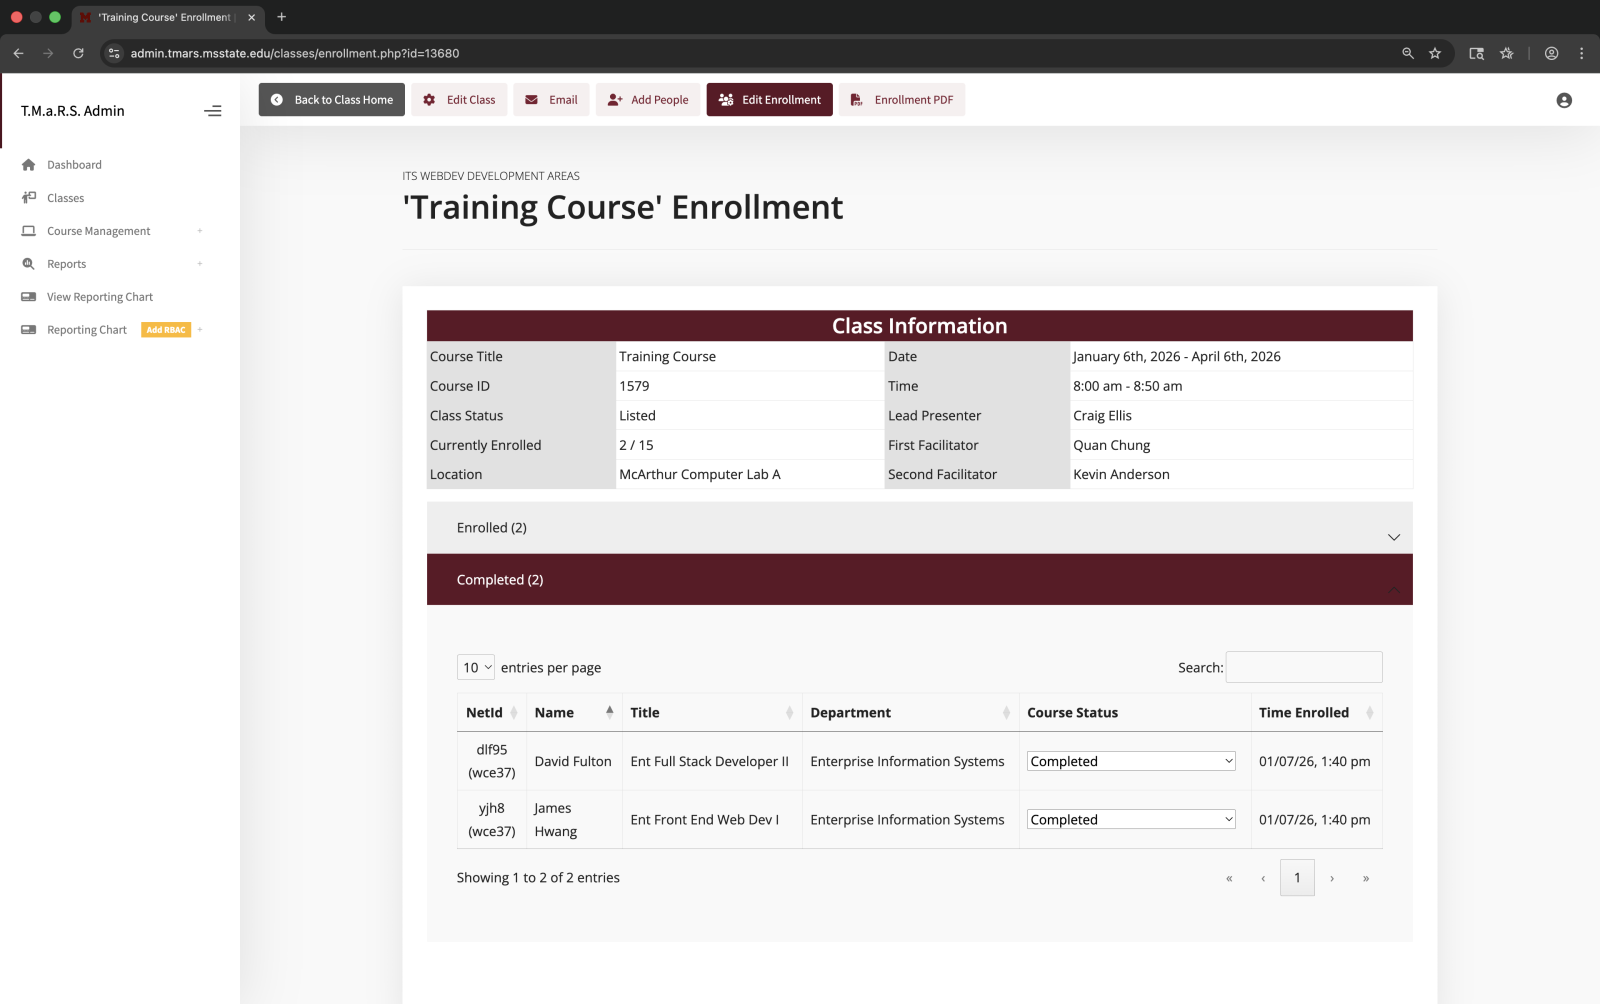
After using "Mark all as Completed," you can adjust individual statuses:
Expand the Completed accordion
Find anyone who didn't actually attend
Change their status dropdown to No Show
Their status updates and they'll appear in the No Show accordion
Similarly, if someone attended but didn't meet completion requirements:
Find them in the Completed accordion
Change their status to Could Not Complete
Recommended Workflow
Here's the most efficient way to process attendance after a class:
Mark everyone as completed - Click "Mark all Enrolled as Completed"
Note no-shows - Check your attendance sheet or sign-in
Update no-shows - Change their status to "No Show" individually
Update failures - If anyone didn't pass, change to "Could Not Complete"
Verify - Review the Completed accordion to ensure accuracy
Why This Matters
Marking attendance as Completed is how the system:
Issues course certifications
Tracks training compliance
Updates certification expiration dates
Generates completion reports
Records training history on transcripts
Always mark attendance as soon as possible after a class ends.
Next Steps
Now that you know how to manage enrollments, you can:
Generate Reports - Run training history and completion reports
Send Communications - Email enrolled participants with updates
Export Enrollment Lists - Download PDFs of enrollment for records
Monitor Certifications - Track certification expirations and renewals
See the Reports guide for information on generating training records and compliance reports.